Jenkins Agents
I am currently a B.Tech student pursuing Computer Science with a specialization in Data Science at I.T.S Engineering College. I am always excited to learn and explore new things to increase my knowledge. I have good knowledge of programming languages such as C, Python, Java, and web development.
Jenkins Master (Server):
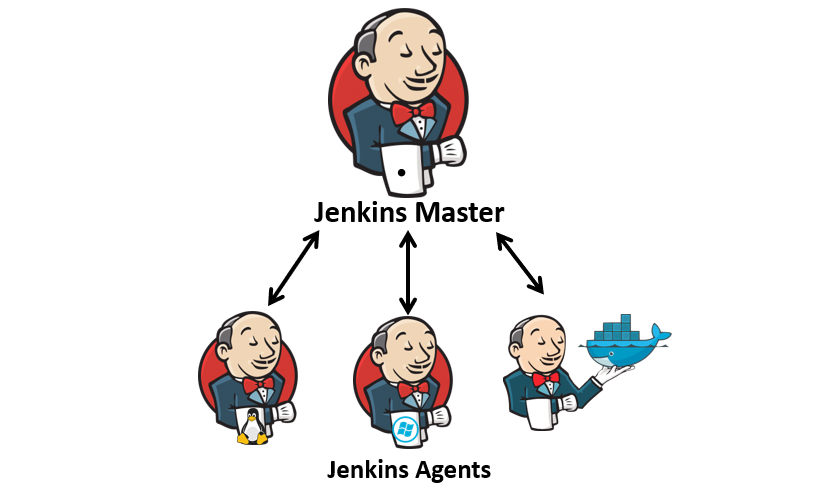
Jenkins follows a master-agent architecture, where the Jenkins Master (Server) is the central controlling entity responsible for orchestrating jobs, managing build execution, and coordinating agent nodes.
Roles and Responsibilities of Jenkins Master
User Interface and Job Management
The Jenkins Master provides a web-based UI for users to create, configure, and manage Jenkins jobs.
It stores job configurations, build logs, and plugin data.
Job Scheduling and Delegation
The master schedules and distributes jobs across available agent nodes based on configurations.
It determines whether a job should run on the master itself or be delegated to an agent.
Build Execution (If No Agents Are Configured)
- By default, Jenkins Master can execute jobs locally, but it's not recommended for resource-intensive builds.
Plugin Management and System Configuration
- Jenkins Master manages plugins, system settings, credentials, and security configurations.
Monitoring and Reporting
- It tracks the status of builds, maintains logs, and provides notifications regarding job outcomes.
Security and Access Control
- Implements authentication and authorization policies to manage user access.
Limitations of Running Builds on the Master
Resource Constraints: Running builds directly on the master can slow down the system.
Scalability Issues: As the number of jobs grows, a single master might become a bottleneck.
Security Risks: Executing jobs on the master can expose critical system resources to potential vulnerabilities.
Best Practices
Use the master only for orchestration and administration—delegate builds to agent nodes.
Configure high availability using multiple masters if needed.
Secure the master using role-based access control (RBAC) and encrypted credentials.
Jenkins Agent:
A Jenkins Agent (a node or slave) is a worker machine that executes build jobs assigned by the Jenkins Master. Agents allow Jenkins to distribute workloads, improve performance, and support different environments.
Roles and Responsibilities of a Jenkins Agent
Build Execution
The primary role of an agent is to build jobs assigned by the Jenkins Master.
It executes tasks like compiling code, running tests, and deploying artifacts.
Workload Distribution
- By using multiple agents, Jenkins can distribute workloads, parallelizing job execution and improving efficiency.
Environment-Specific Execution
Agents can be configured with different OS, programming environments, and dependencies.
This is useful for running builds on different platforms (e.g., Windows, Linux, macOS).
Reporting to Master
- After executing a job, the agent sends logs, status updates, and artifacts back to the master.
Resource Management
- Agents help manage CPU, memory, and disk usage more effectively by offloading work from the master.
Types of Jenkins Agents
Static Agents
Pre-configured nodes that are always available.
Useful for dedicated build environments.
Dynamic Agents
Created on demand using cloud providers like AWS, Kubernetes, or Docker.
Reduces resource usage when agents are idle.
Permanent Agents
Manually configured with a persistent connection to the master.
Often used in on-premises environments.
Ephemeral Agents
Spin up temporarily for a job and terminate after execution.
Common in cloud-based CI/CD pipelines.
Agent Connection Methods
SSH Connection
- The master connects to the agent via SSH and starts the agent process.
JNLP (Java Network Launch Protocol)
Agents connect to the master using the Jenkins agent.jar file.
Useful when agents are behind firewalls or running on different networks.
Docker-Based Agents
- Agents run inside Docker containers, providing isolated environments for builds.
Kubernetes-Based Agents
- Jenkins dynamically provisions pods as agents, making it ideal for cloud-native CI/CD.
Why Use Jenkins Agents?
1. Scalability – Distribute workloads efficiently across multiple machines.
2. Improved Performance – Offload builds from the master, preventing bottlenecks.
3. Flexibility – Run jobs on different OS and environments as needed.
4. Security – Isolate build jobs from the master to reduce risks.
Pre-requisites:
Before setting up a Jenkins Agent, ensure that the following prerequisites are met:
1. Jenkins Master Setup
A Jenkins Master should already be installed and running.
Ensure the master is accessible from the agent machine over the network.
Install necessary plugins (e.g., "SSH Build Agents" for SSH-based agents or "Kubernetes Plugin" for cloud-based agents).
2. Agent Machine Requirements
A separate machine (physical or virtual) with sufficient resources (CPU, RAM, Disk).
The agent OS should be compatible with Jenkins (Linux, Windows, macOS).
3. Java Installation
Install Java (JDK 8 or later) on both the master and agent.
Verify Java installation using:
java -versionEnsure the JAVA_HOME environment variable is correctly set.
4. Network and Security Configurations
Ensure network connectivity between Jenkins Master and Agent.
Open required ports based on the connection type:
SSH Agents: Ensure SSH (port 22) is enabled and accessible.
JNLP Agents: Open required ports (default: 50000+).
Docker/Kubernetes Agents: Ensure appropriate API and service ports are open.
Configure firewall rules if needed to allow communication.
5. User Permissions
The agent machine should have a user with the necessary permissions to execute Jenkins jobs.
If using SSH, ensure passwordless authentication or key-based authentication is configured.
6. Agent Connection Setup
Depending on the method used, additional configurations may be required:
For SSH-Based Agents:
The agent machine should have an SSH server running.
Add the agent’s SSH key to the Jenkins Master.
For JNLP (Java Web Start) Agents:
The agent should be able to download the agent.jar file from the master.
Ensure Java is installed on the agent.
For Docker/Kubernetes-Based Agents:
Docker should be installed if using containerized agents.
Kubernetes cluster access should be configured if using Kubernetes-based agents.
7. Jenkins Agent Setup on Master
Navigate to Manage Jenkins → Manage Nodes and Clouds → Add a new agent.
Configure agent settings (name, labels, remote directory, etc.).
8. Test the Agent Connection
After configuring the agent, launch it and check logs to ensure a successful connection.
Verify by running a sample job on the agent.
Task-01
Create an agent by setting up a node on Jenkins
Create a new AWS EC2 Instance and connect it to the master(Where Jenkins is installed)
The connection of the master and agent requires SSH and the public-private key pair exchange.
Verify its status under the "Nodes" section.
You can follow this article for the same
Step 1: Create an AWS EC2 Instance for the Agent
Log in to AWS Console and navigate to EC2 Dashboard.
Click Launch Instance and configure:
Amazon Machine Image (AMI): Choose Ubuntu 20.04 or Amazon Linux 2.
Instance Type: Select at least t2.medium for better performance.
Key Pair: Choose an existing key pair or create a new one (Download it for SSH access).
Security Group:
Allow SSH (port 22) from Jenkins Master’s IP.
Allow required ports for Jenkins (default 8080 for UI, 50000 for JNLP agents).
Click Launch to start the instance.
Step 2: SSH into the EC2 Instance
Open a terminal and connect using the private key:
ssh -i your-key.pem ubuntu@Update and Install Java:
sudo apt update && sudo apt install -y openjdk-11-jdkjava -version
Step 3: Configure SSH Access Between Master and Agent
On the Agent (EC2 Instance):
Create a Jenkins User:
sudo useradd -m -s /bin/bash jenkinssudo passwd jenkinsAllow SSH Access for Jenkins User:
sudo su - jenkinsmkdir -p ~/.ssh && chmod 700 ~/.sshCopy the Jenkins Master’s Public Key to
~/.ssh/authorized_keys:From the Jenkins Master, generate an SSH key if not already done:
ssh-keygen -t rsa -b 4096cat ~/.ssh/id_rsa.pubCopy the key and paste it into the Agent's
~/.ssh/authorized_keys:echo "<PASTE MASTER'S PUBLIC KEY>" >> ~/.ssh/authorized_keyschmod 600 ~/.ssh/authorized_keys
Test SSH Connection from Master to Agent:
ssh jenkins@
Step 4: Add the Agent Node in Jenkins
On Jenkins Master UI:
Go to:
Manage Jenkins → Manage Nodes and Clouds → New Node.Enter a Node Name (e.g.,
AWS-Agent), select Permanent Agent, and click OK.Configure:
Remote Root Directory:
/home/jenkinsLabels: Add labels like
awsorlinux(useful for job assignments).Launch Method: Select Launch Agents via SSH.
Host: Enter the Agent’s Private IP (or Public IP if external).
Credentials:
Click Add → Jenkins → SSH Username with the private key.
Enter
jenkinsthe username.Select Enter directly and paste the private key from Master (
~/.ssh/id_rsa).
Click Save.
Click “Launch Agent” to start the connection.
Step 5: Verify Agent Connection
Go to
Manage Jenkins → Manage Nodes and Clouds.The new agent should appear with "Connected" status.
Run a test job to verify execution on the agent.